How To Navigate Recorder (Detailed)
This guide gives you clear steps to record and manage a podcast studio. It covers setup, adding guests, recording, and editing. With this easy-to-follow resource, you can improve your podcast quality and work more efficiently.

Tip: Words to know
Studio: The online recording studio that allows people to record podcasts together in different places
Track: A row in a video editing timeline.
1. Navigate to https://app.podup.com/home
There are 2 ways to navigate to "Recorder"
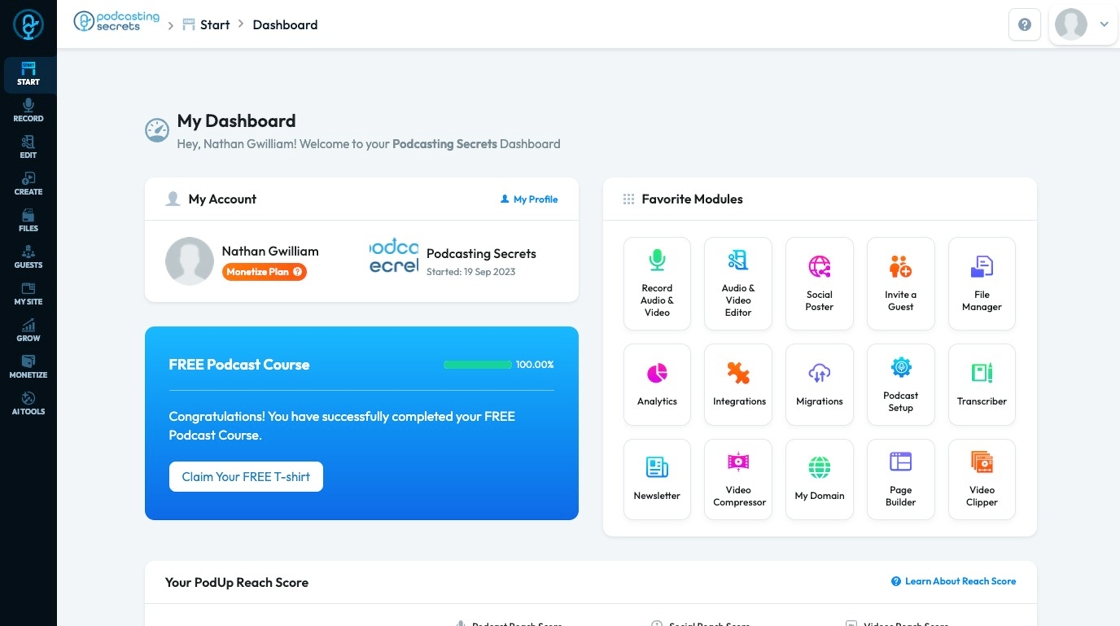
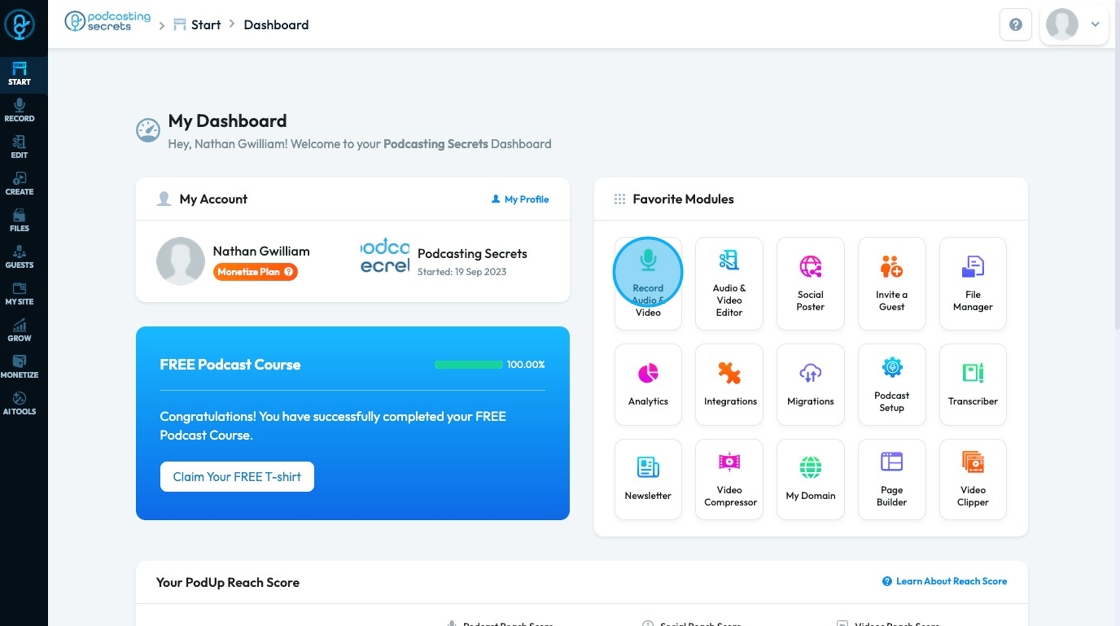
2. 1. Click "Record Audio & Video" in "Favorite Modules" on the Dashboard
3. 2. Click "Record"
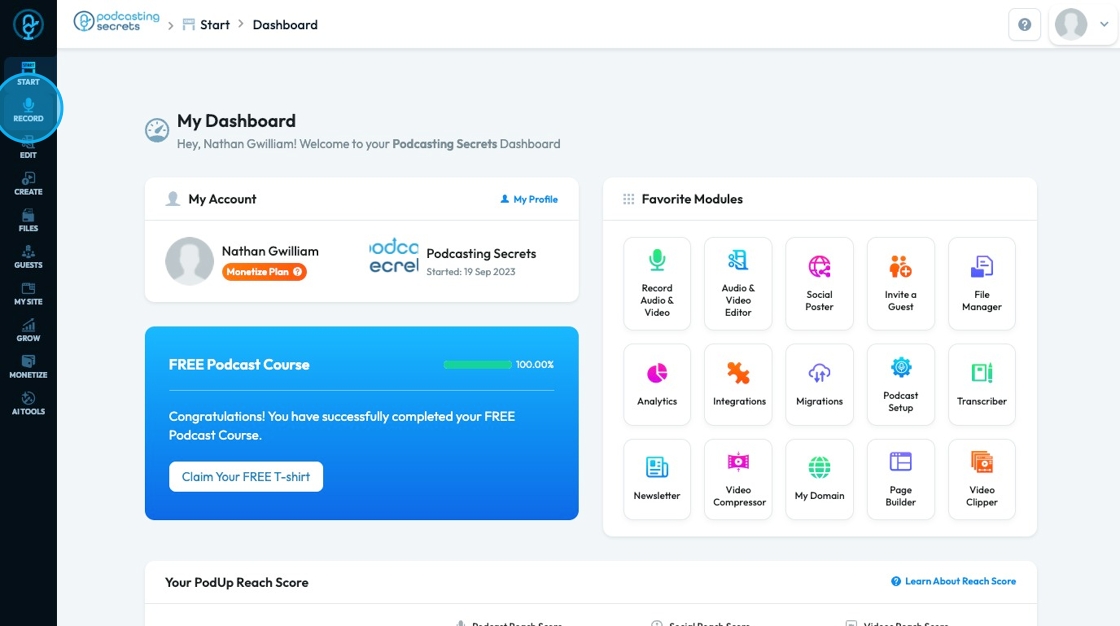
4. Click "Recorder"

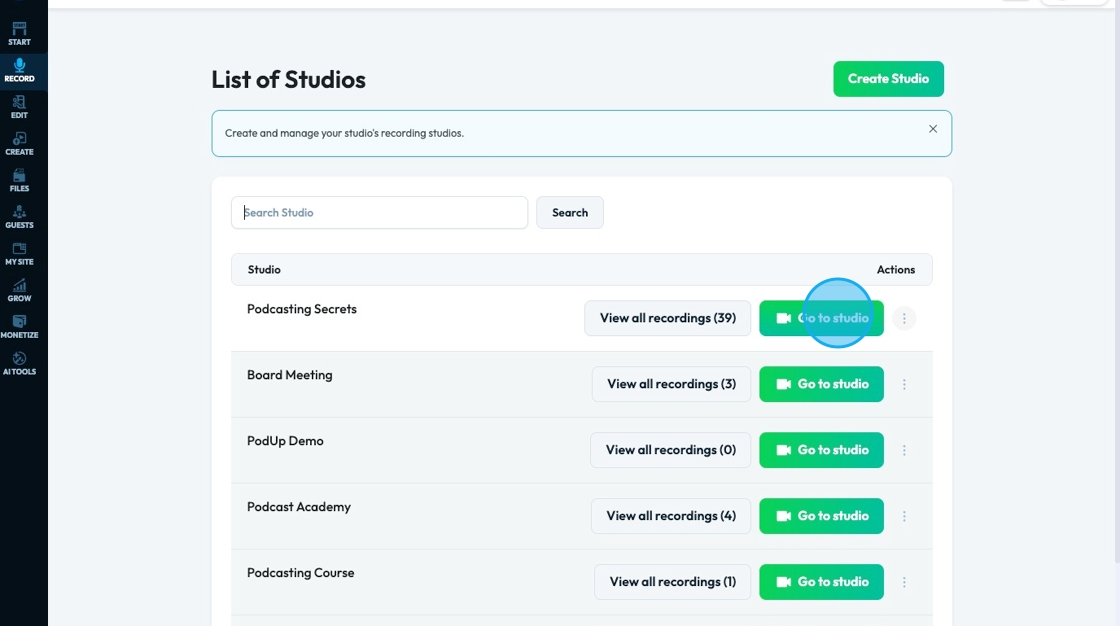
5. "Recorder" will open with a List of Studios. You can search for a specific studio through the "Search Studio" field.
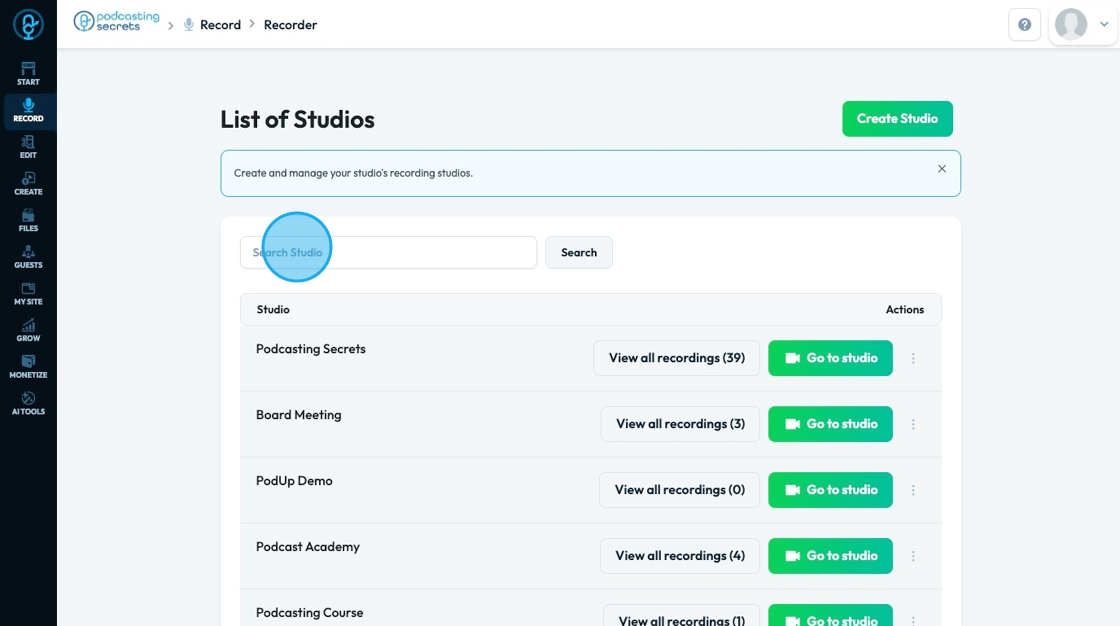
6. Click "Go to studio" to enter the studio or "View all recordings" to view the recordings from that specific studio
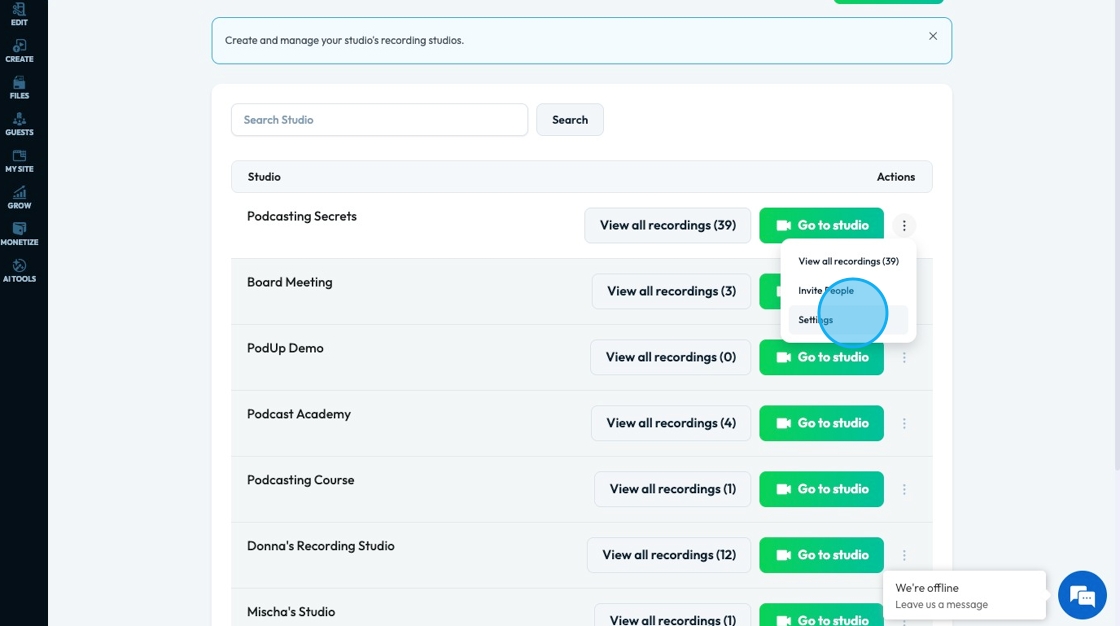
7. The 3 dots under actions will allow you to view all recordings, invite people to the studio, and open settings for that specific studio
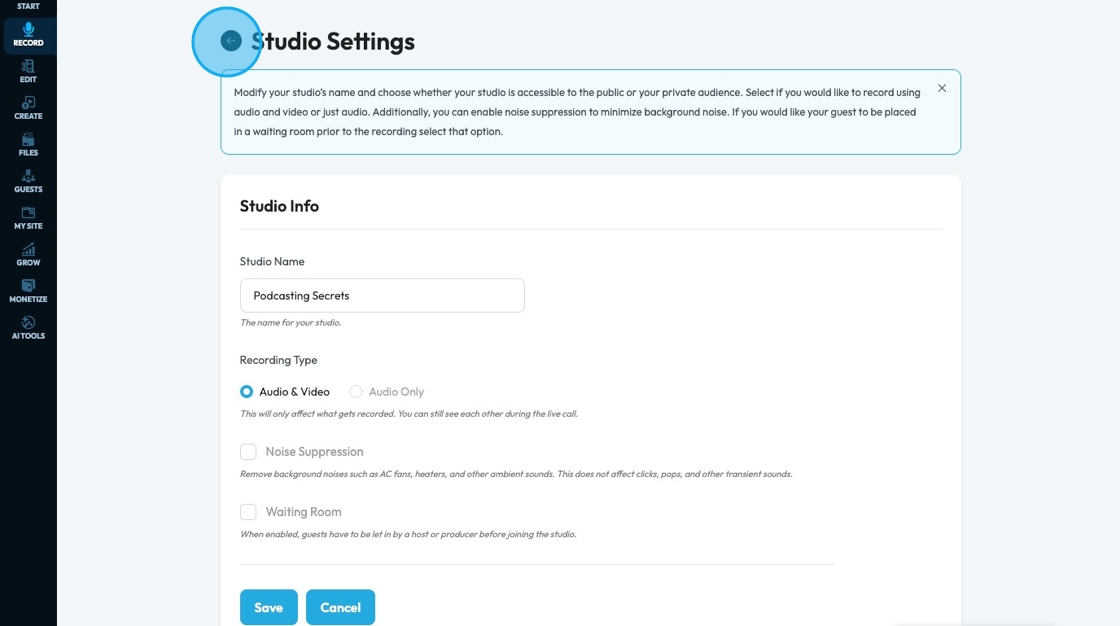
8. "Studio Settings" allows you to change the studio name, adjust the recording type, suppress background noise, and have a waiting room. Click "Save" to keep the changes that you made
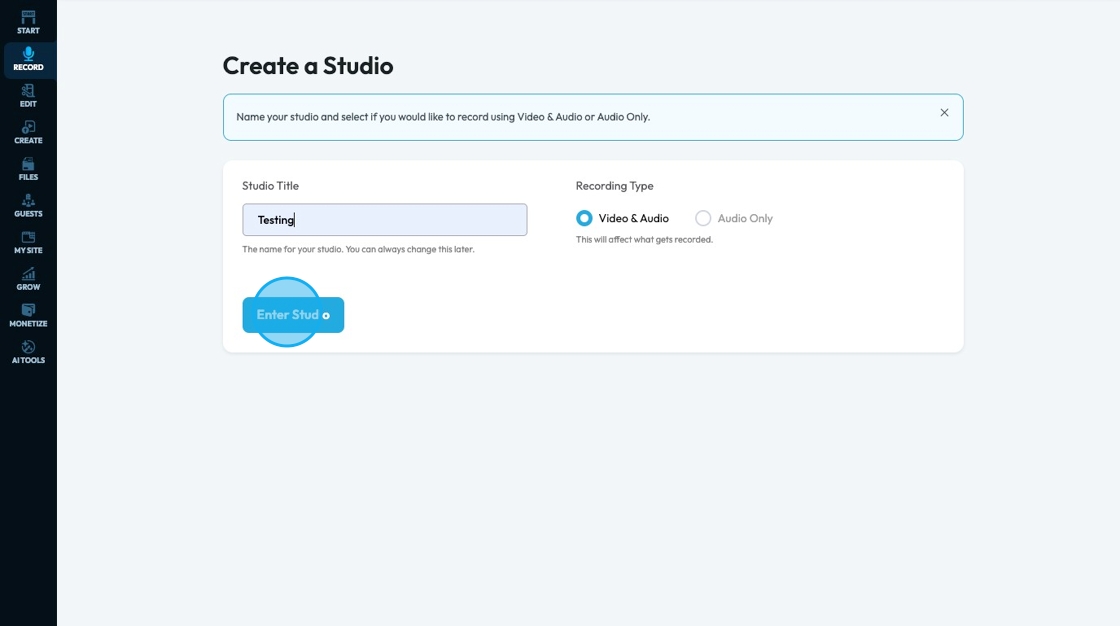
9. To open a new studio, click "Create Studio"
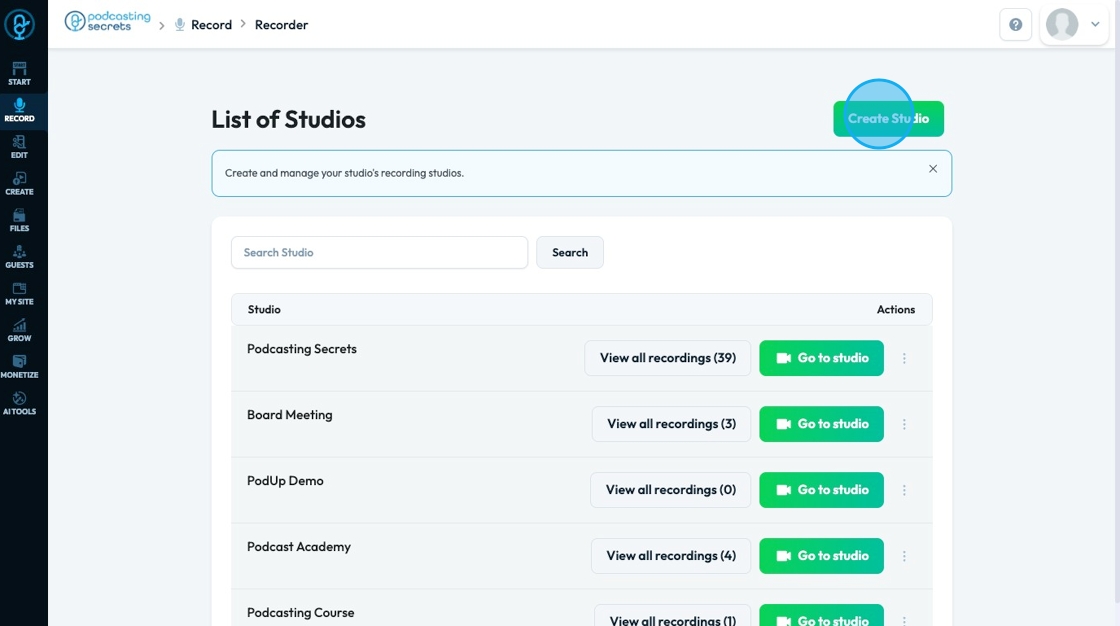
10. To create a studio, add a studio title and select a recording type
You can select "Video & Audio" or "Audio Only". If you select audio only, your studio will not record any video
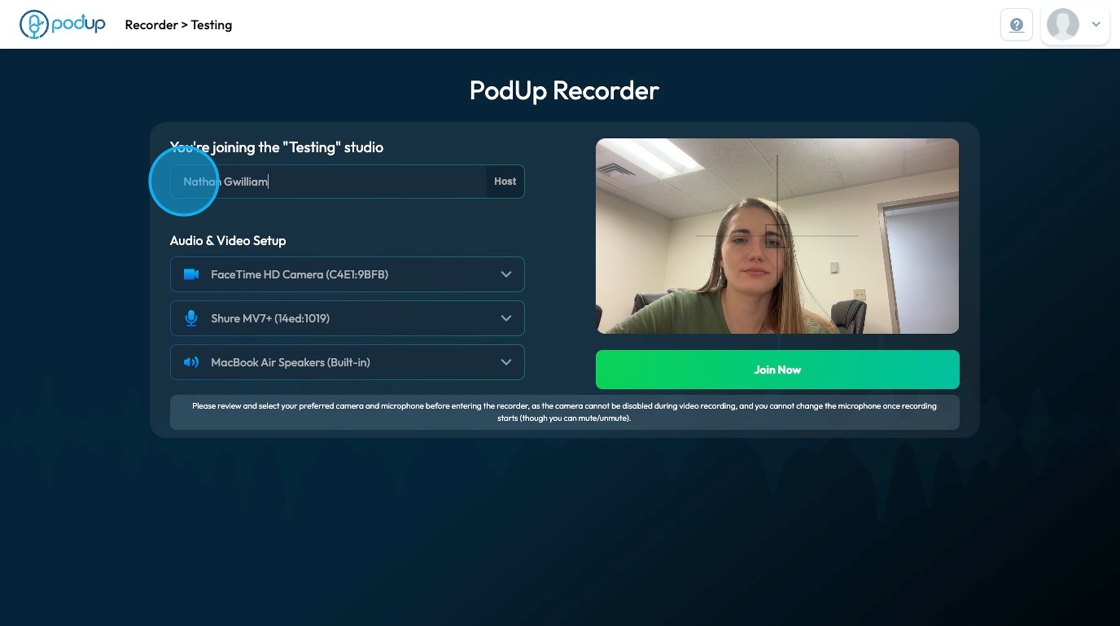
11. Once you enter the studio, you need to add your name and select the camera, microphone, and speaker that you want to use. Click "Join Now" to enter the Recorder
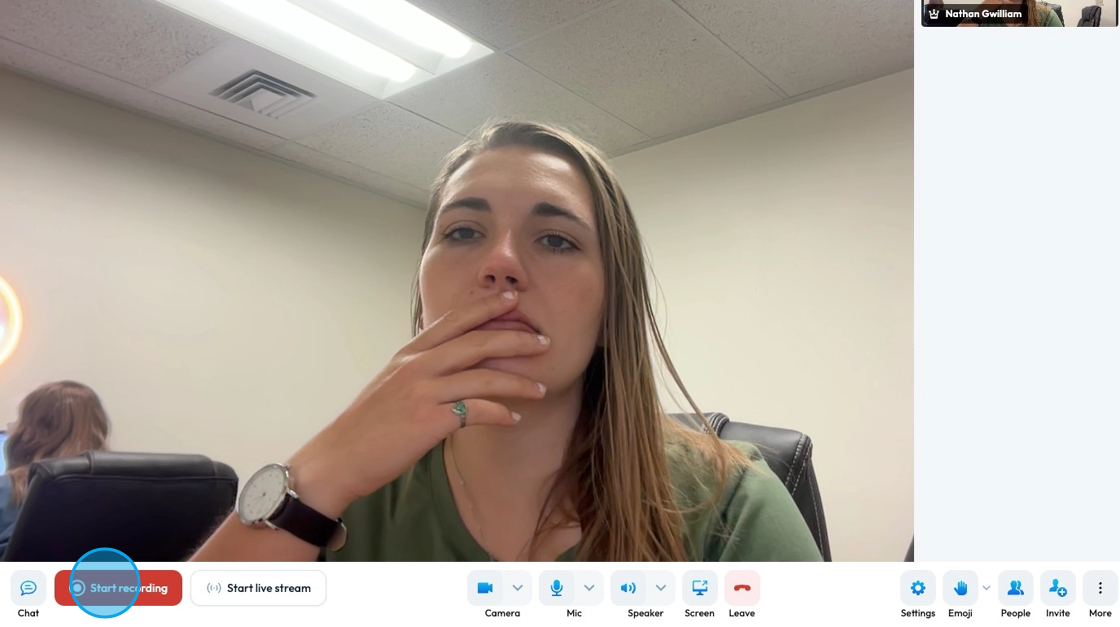
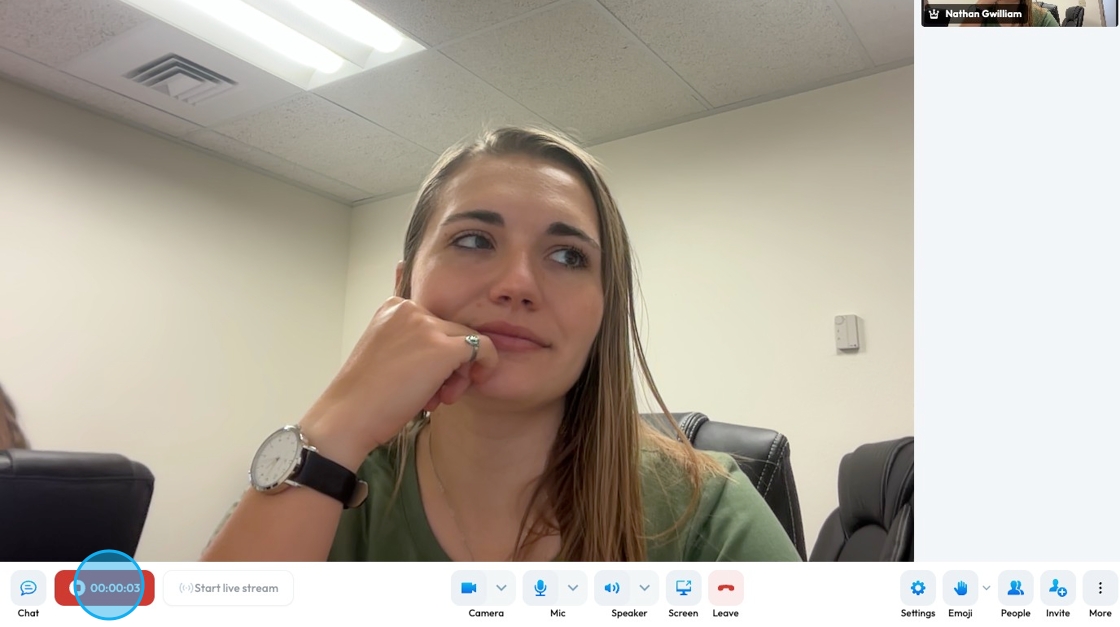
12. Easily start and stop the recording by clicking "Start recording"
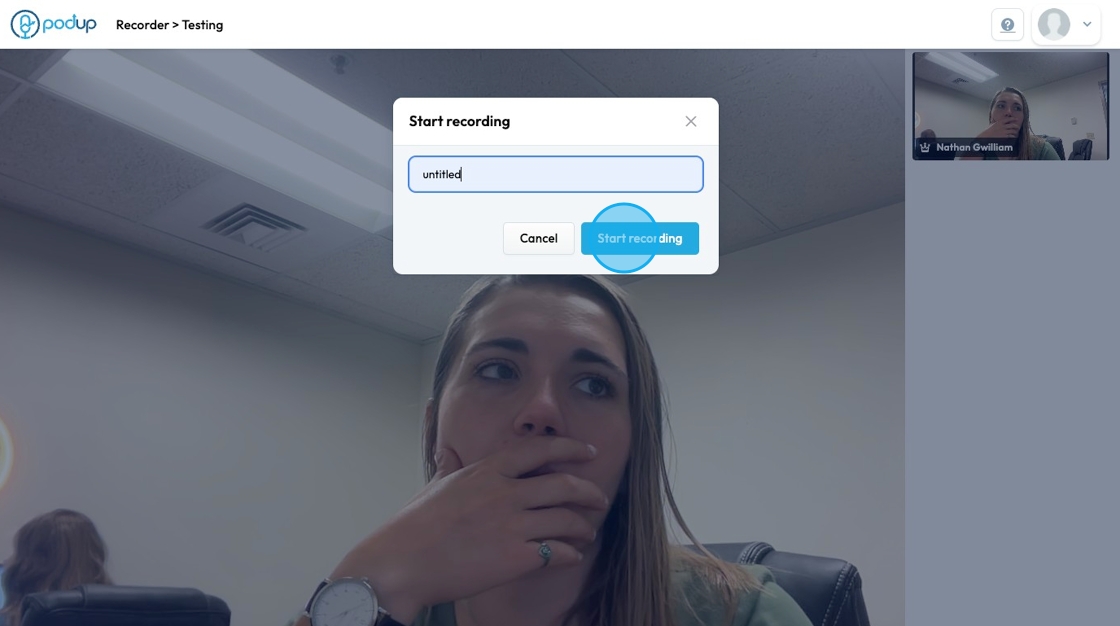
13. Label your recording and start recording by clicking "Start recording"
- You will have 10 seconds from when you click "Start Recording" to when the recording will officially start
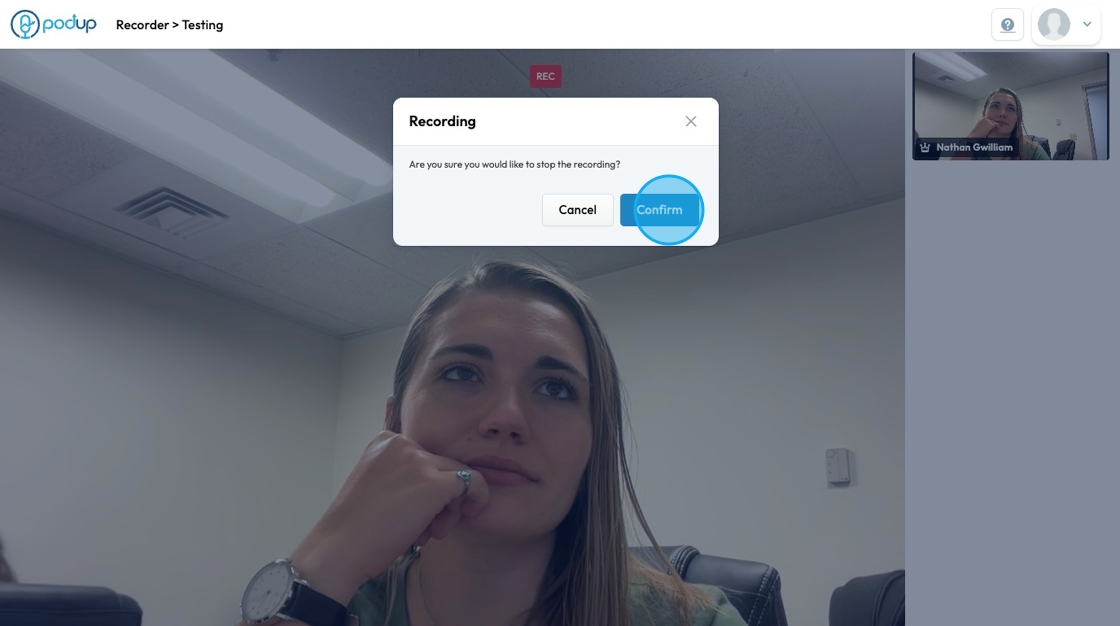
14. Stop the recording by clicking the red timer in the bottom left corner
- Stopping the recording will not end the call. *See step 33 to leave the show
- You can stop and start as many times as you need. A separate recording will be saved every time you start and stop
15. Click "Confirm" to save the recording
- You and your guest must stay in the studio until the recording uploads otherwise you risk losing your recording
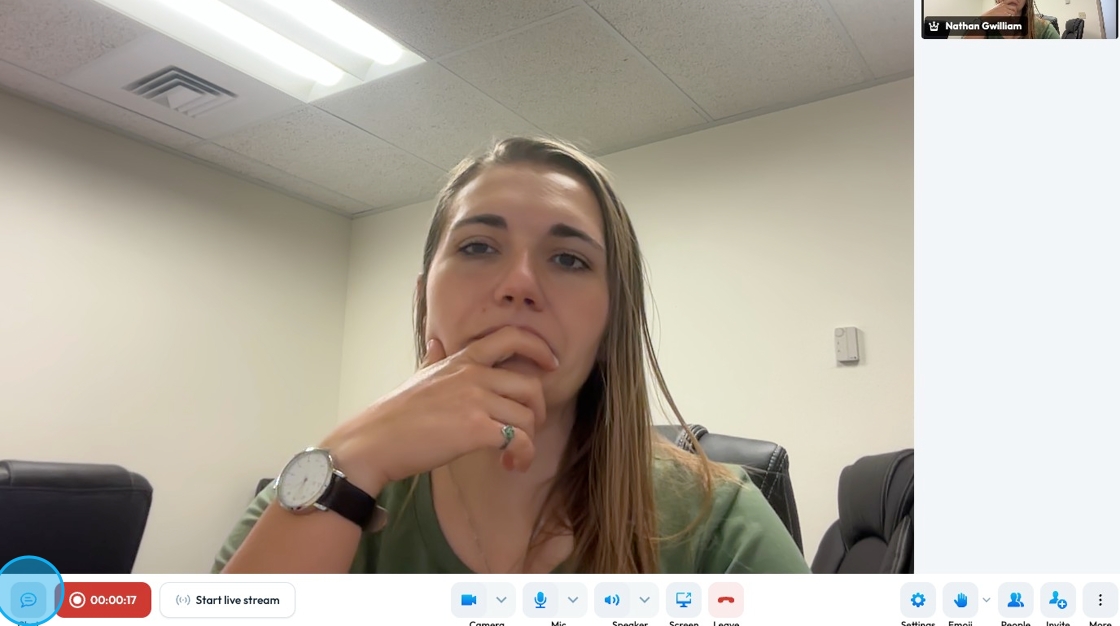
16. Click the chat icon in the bottom left-hand corner to chat with your guest.
- Note: This chat will not appear on your recording
17. In the chat you can also create a poll for your guest by clicking "Polls"

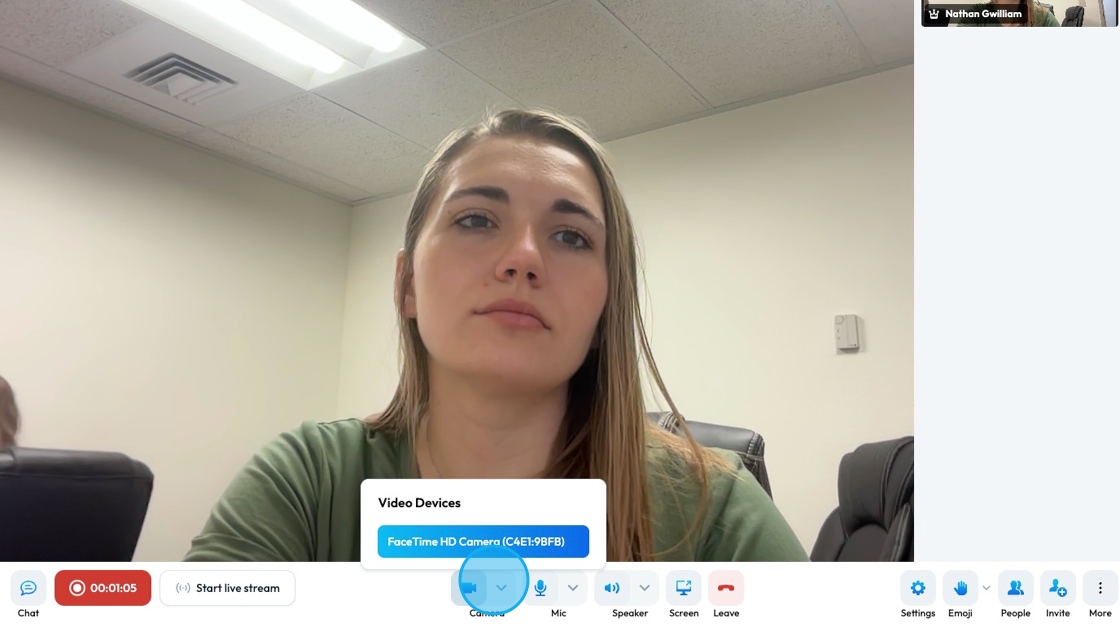
18. The camera icon at the bottom will allow you to change the input for your video recording
- Camera cannot be changed during the recording
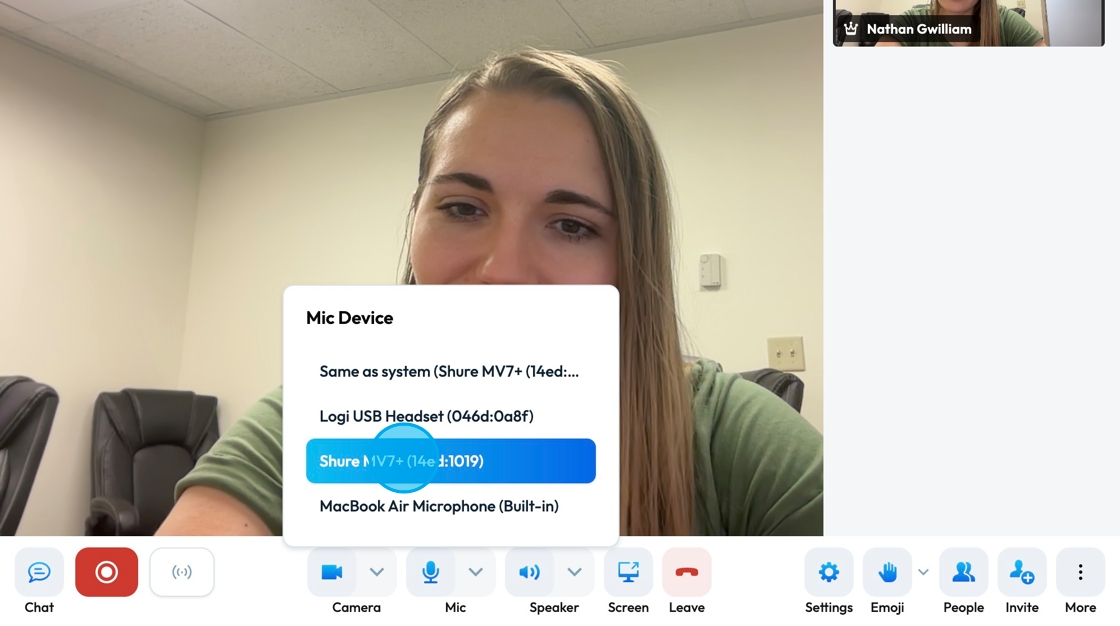
19. The mic icon at the bottom will allow you to change the input for your microphone
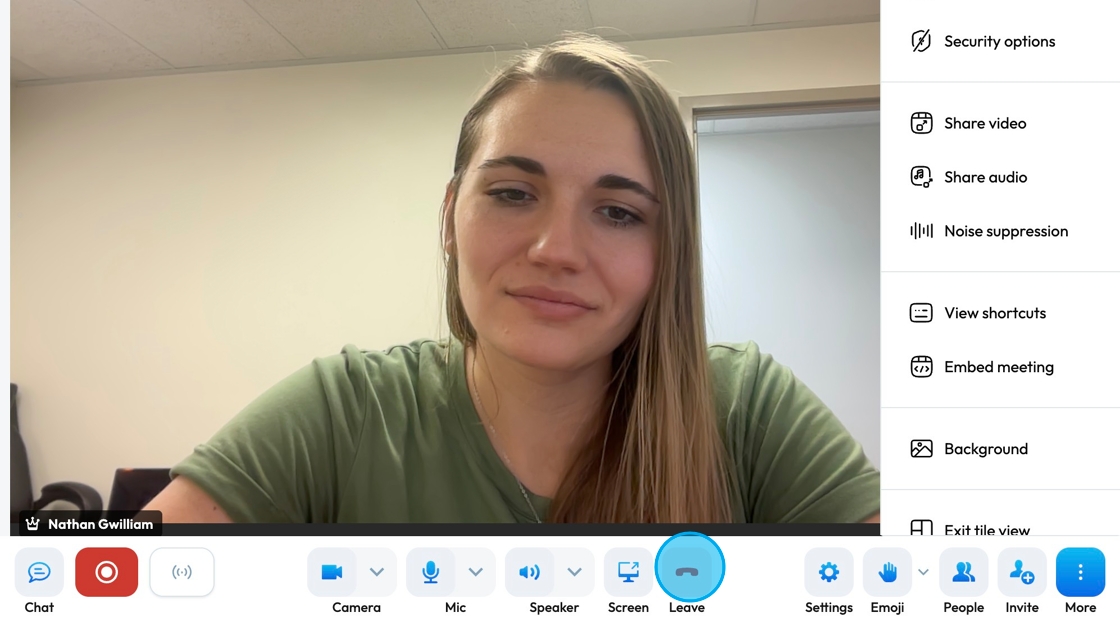
- Microphone cannot be changed during the recording
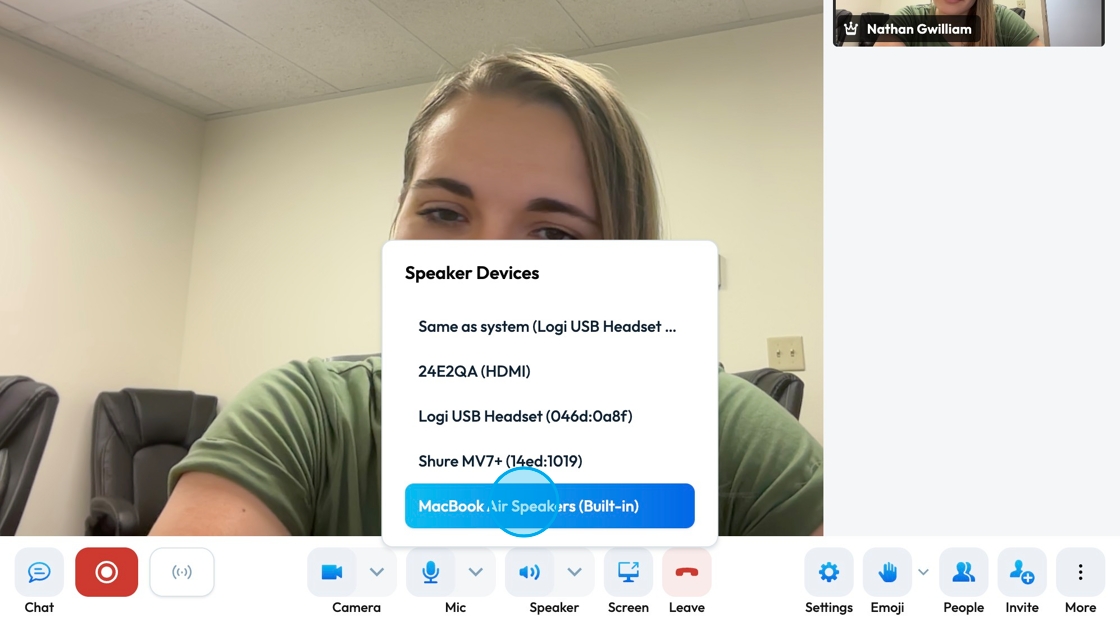
20. The speaker at the bottom will allow you to change your speaker - the output for the audio
- Speaker cannot be changed during the recording
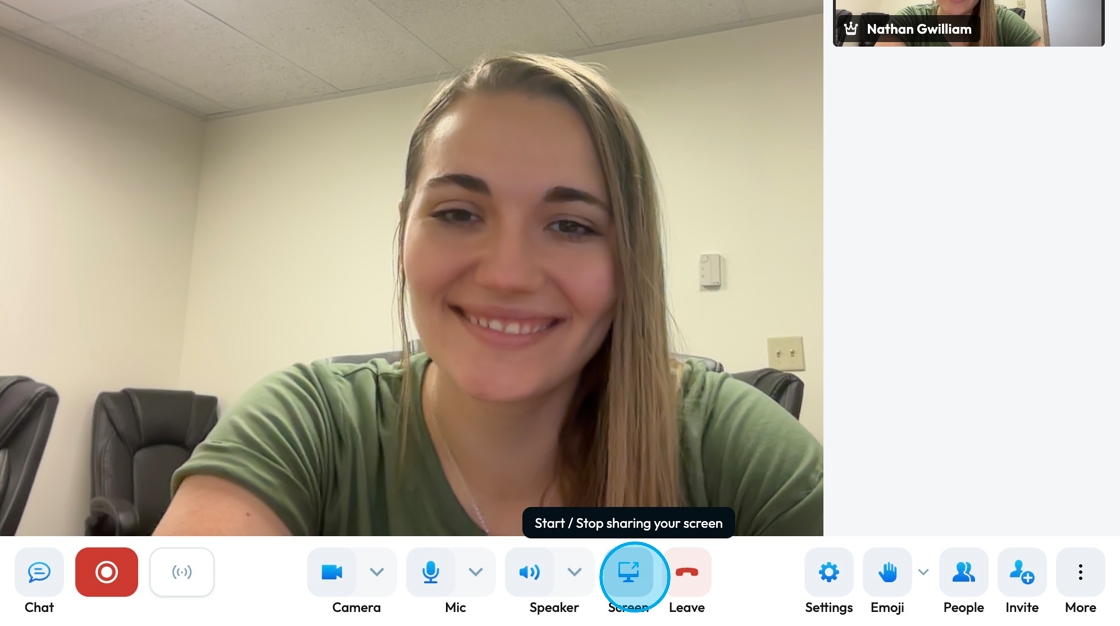
21. Share your screen by selecting the "Screen" icon at the bottom. A pop-up will appear to allow you to select the window you want to share
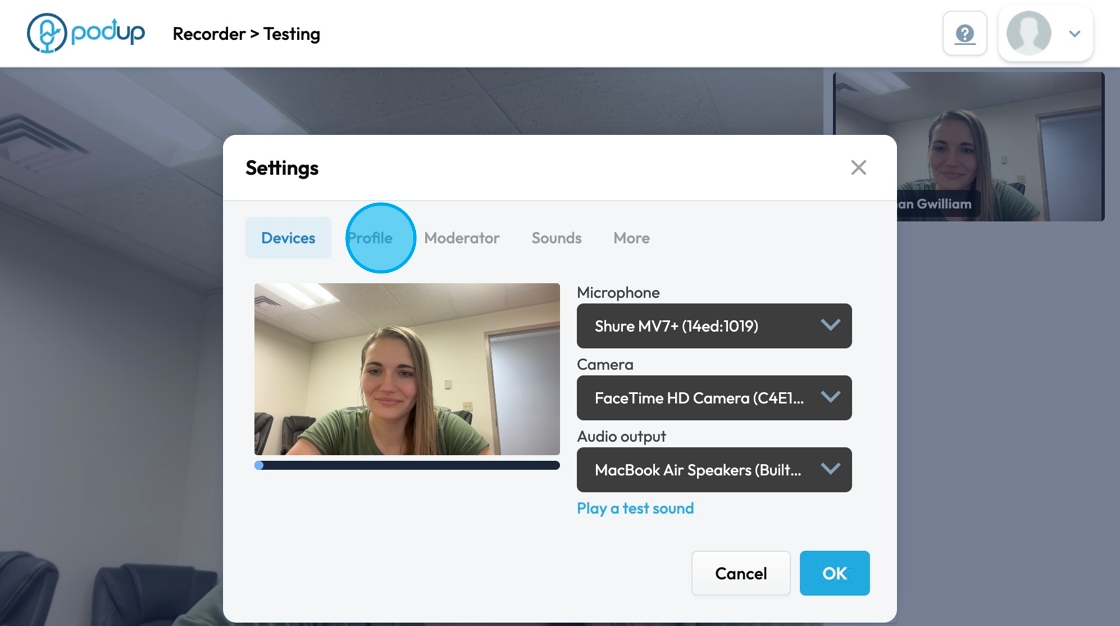
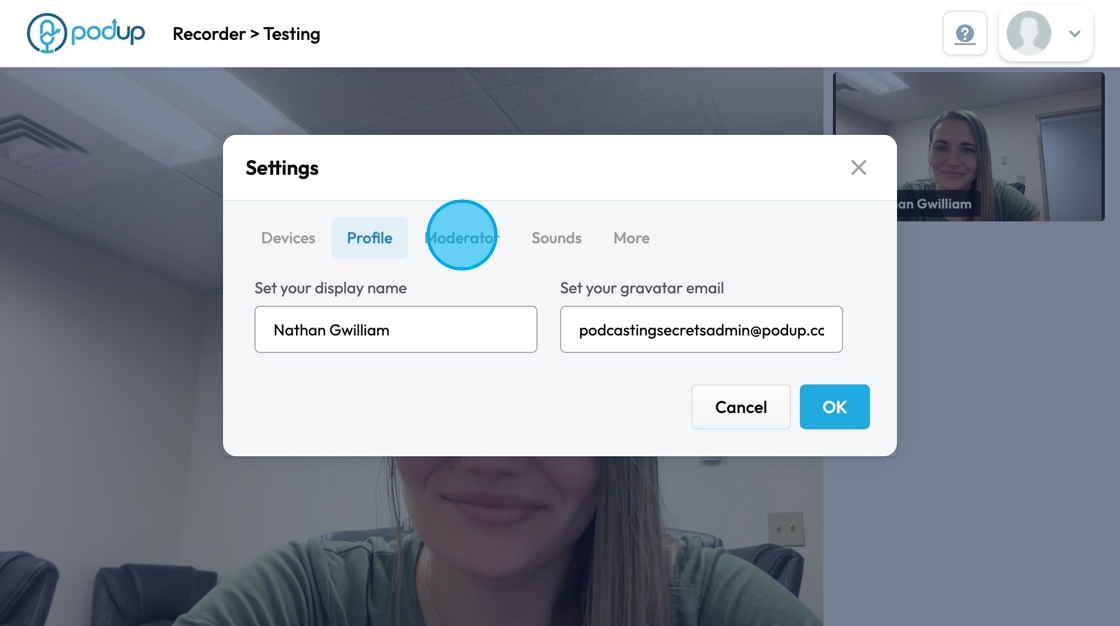
22. Click "Settings" to open the settings. Settings contains
- Devices
- Profile
- Moderator
- Sounds
- More

23. "Devices" shows you your current microphone, camera, audio output, and a thumbnail of what your image looks like. The drop-down bar for each category can be selected to change the setting. Select "OK" to save changes.
- The black bar under your image shows the audio being picked up by your microphone
- The audio output can be tested by selecting the blue "Play a sound test". If you cannot hear the sounds, adjust your audio output
24. "Profile" shows your display name and your gravatar email. You can change both by selecting the desired field and typing in your preferred name and email. Select "OK" to save changes
- Gravatar: "Globally Recognized Avatar" - a service that shows your profile picture automatically on websites when you use your email address
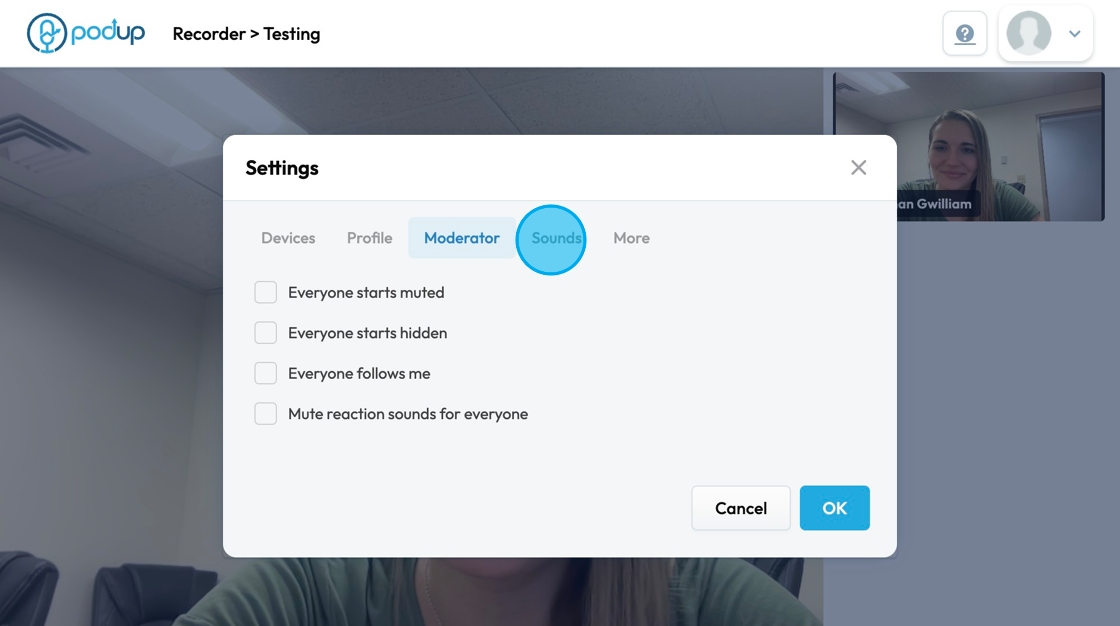
25. "Moderator" allows you to adjust the settings of the studio. Click "Ok" to save changes
- Everyone starts muted
- Everyone starts hidden
- Everyone follows me: When the host scrolls or plays an audio, the screen follows their movement
- Mute reaction sounds for everyone: The emojis make noises so this will mute the sounds of the emoji or reaction for everyone
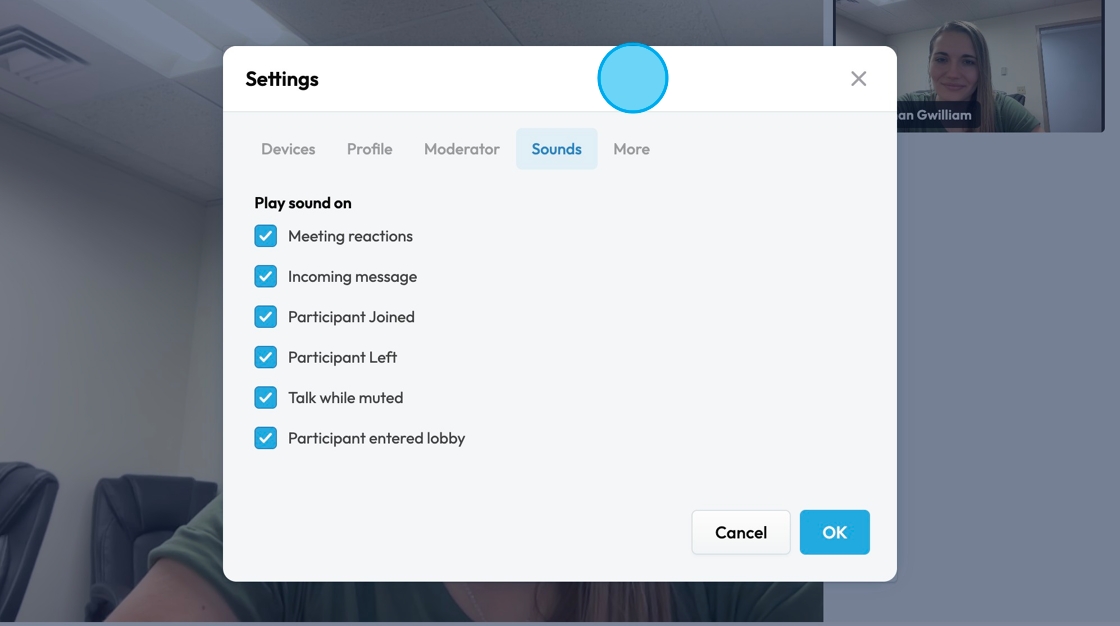
26. "Sounds" will let you adjust when you want sounds to play. Select "OK" to save changes
- Meeting reactions
- Incoming message
- Participant Joined
- Participant Left
- Talk while muted
- Participant entered lobby
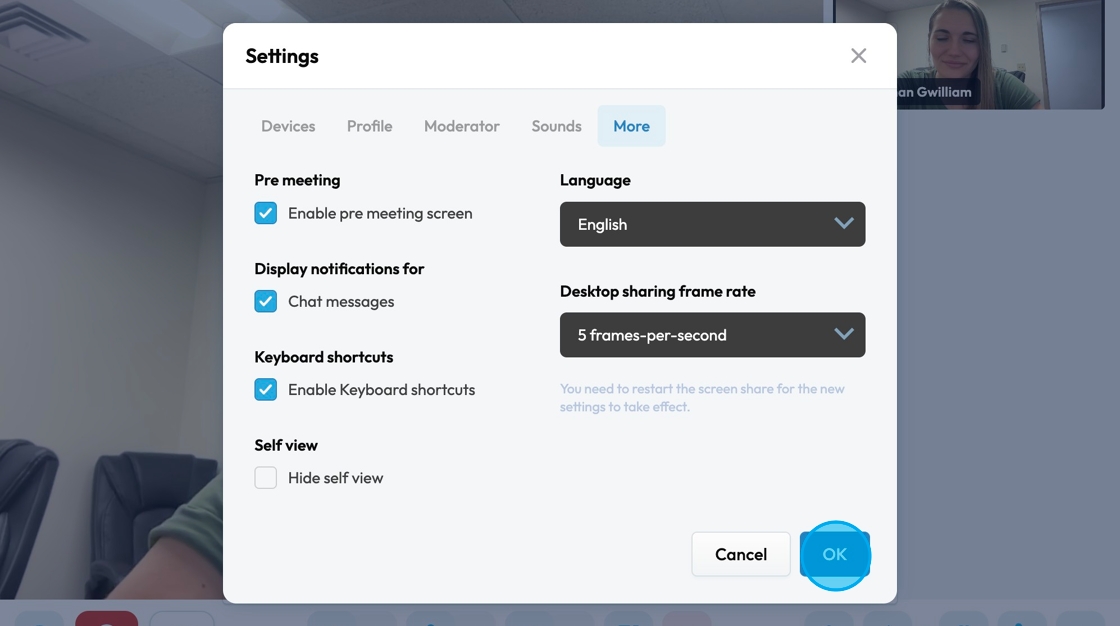
27. "More" allows you to adjust the pre-meeting screen, display notifications, keyboard shortcuts, self view, language of the recorder, and desktop sharing frame rate. Select "OK" to save changes
- The recorder can be translated into more than 50 languages
- Desktop sharing frame rate can be 5, 15, or 30 frames-per-second
- [[What is optimal desktop sharing frame rate?]]
[[It’s how many times per second your screen updates when you share it during a video call or presentation.]]
[[What do 5, 15, and 30 mean?]]
[[5 fps: Low frame rate, screen updates slowly. Good for static content like slides or documents. Saves bandwidth but can look choppy.]]
[[15 fps: Medium frame rate, smoother than 5. Good balance for most uses—text, browsing, and some movement.]]
[[30 fps: High frame rate, very smooth and clear, best for fast motion like videos or gaming but uses more bandwidth.]]
[[Optimal choice: Usually 15 fps is enough for desktop sharing—smooth enough without heavy bandwidth use.]]
- [[What is optimal desktop sharing frame rate?]]
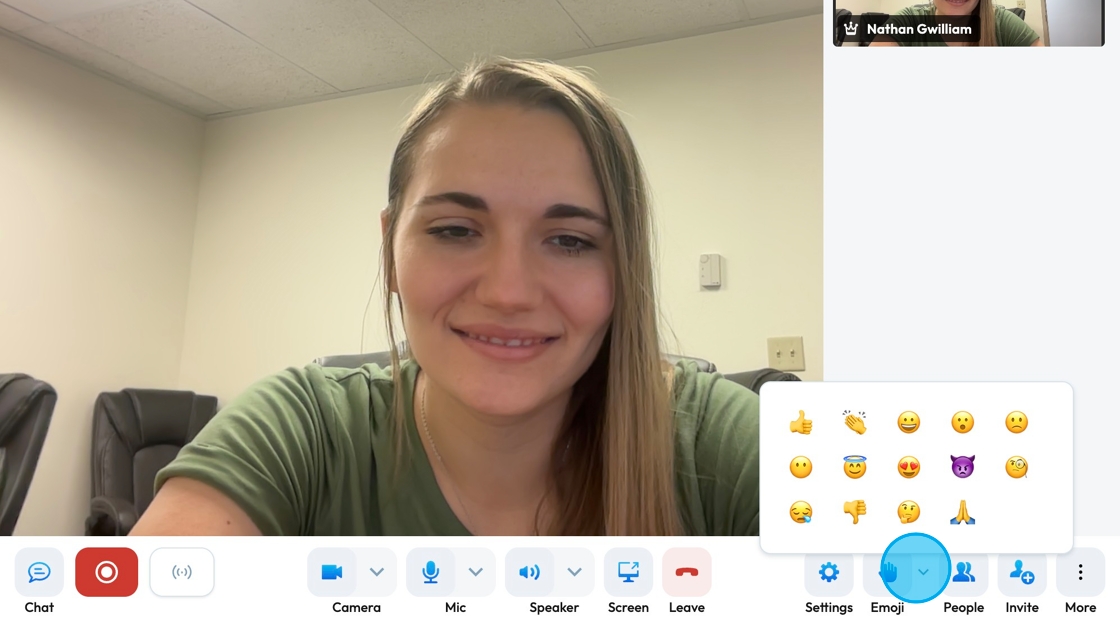
28. Click "Emoji" to send a hand raise or reaction to your guest in the studio
- These will not show up on your final recording
29. "People" will show the current meeting participants and allow you to invite someone to the show
- You can use the search bar to find a participant

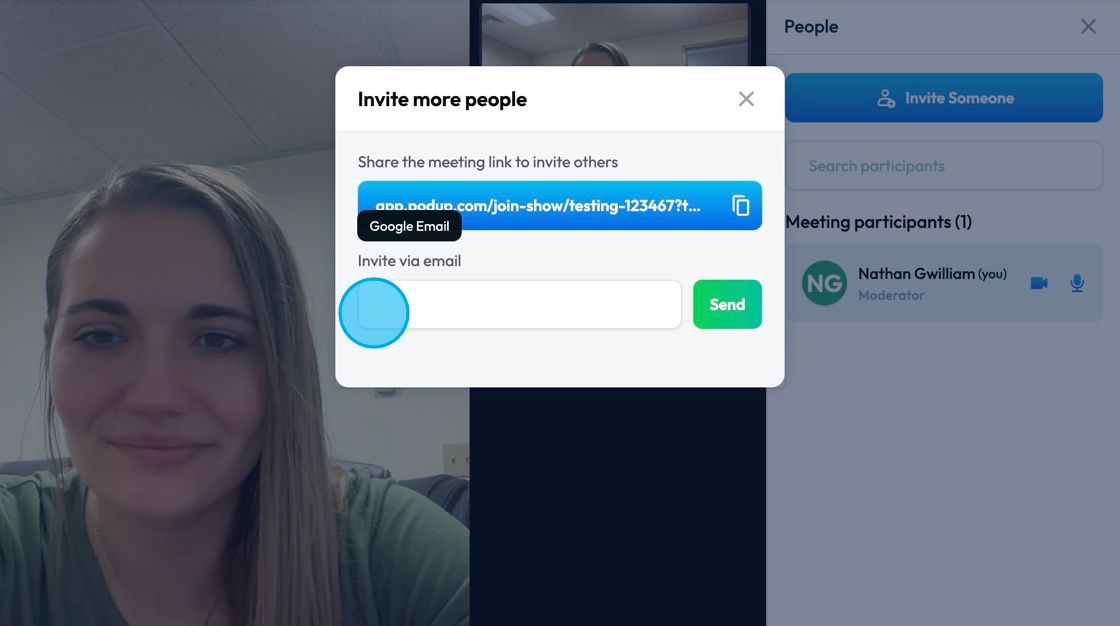
30. Invite people easily by sending them the show URL or emailing them an invitation
This can be accessed by
- The blue button labeled "Invite Someone" in the "People" tab
- The "Invite" tab
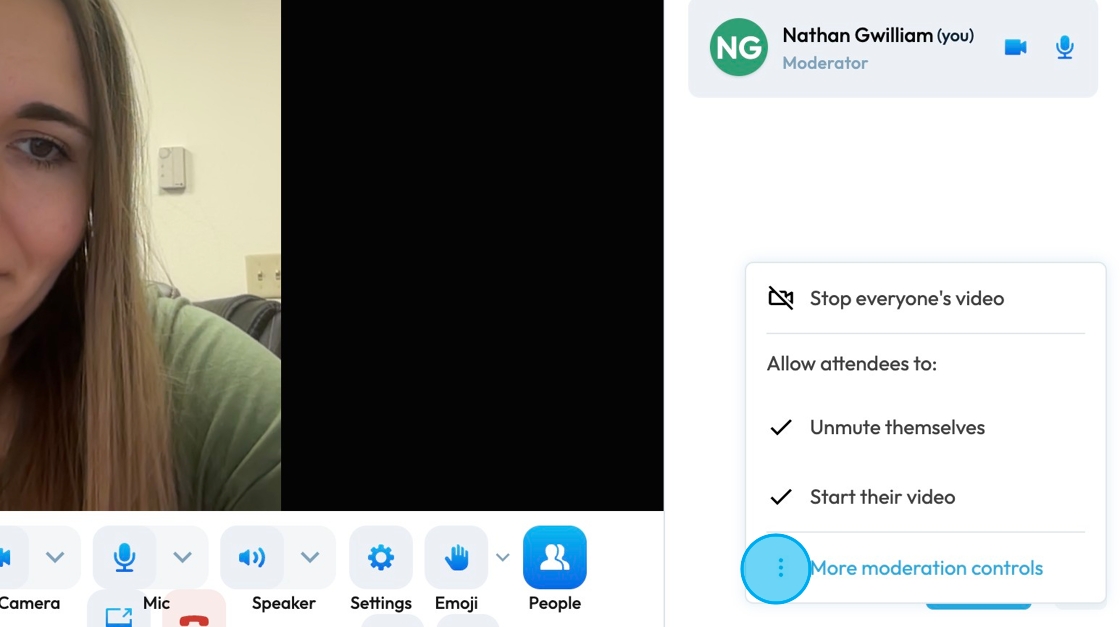
31. You can mute all participants by selecting "Mute all" in the bottom right-hand corner.
The 3 dots in the bottom right-hand corner allow you to stop everyone's video as well as authorize the attendees to unmute themselves and start their video. The "More moderation controls" will lead you to the "Moderator" section of "Settings" *See step 25
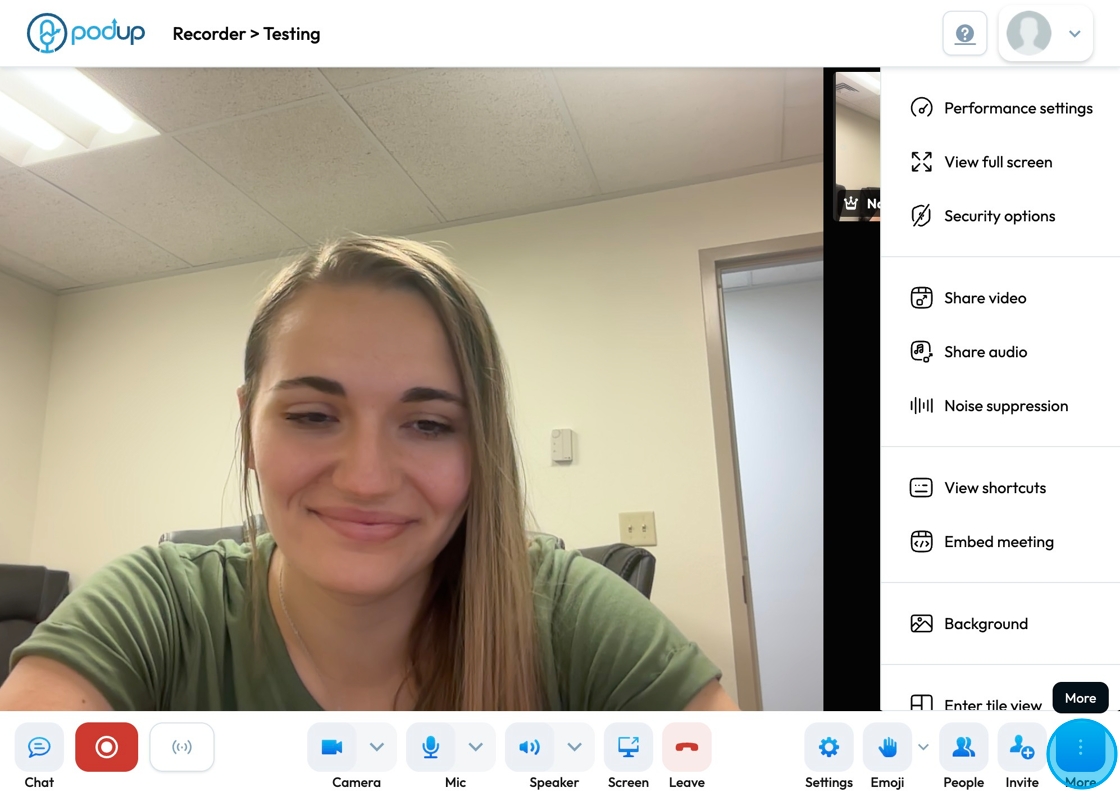
32. Click "More" for a list of 10 other setting
- Performance settings: Adjust the recording to what looks best ("Best performance" and what is the best quality ("Highest Quality")
- View fullscreen: Make the image big enough to fill the full-screen
- Security options: Create a password for your Show
- Share video: Share a video through it's URL
- Share audio: Watch a tutorial on how to share audio then a popup will prompt you to share audio
- Noise suppression: Will enable suppression of background noise like a vacuum or a loud car
- View shortcuts: View all the keyboard tricks to help make navigation in the recorder easier
- Embed meeting: Copy the code into a website to embed this meeting link
- Background: Change your background easily with a pre-provided image, a blur, or inserting your own image
- Enter tile view: Display all the guest of the show at one time
33. Click "Leave" to exit the recording studio
- This does not end the recording. Make sure to save your recording before leaving the call.
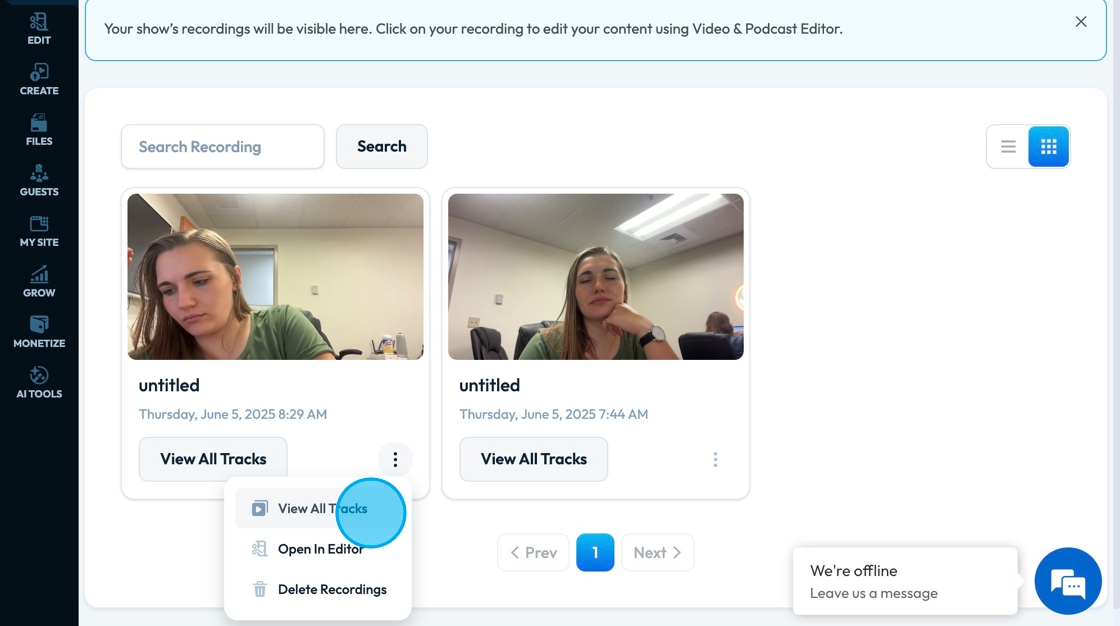
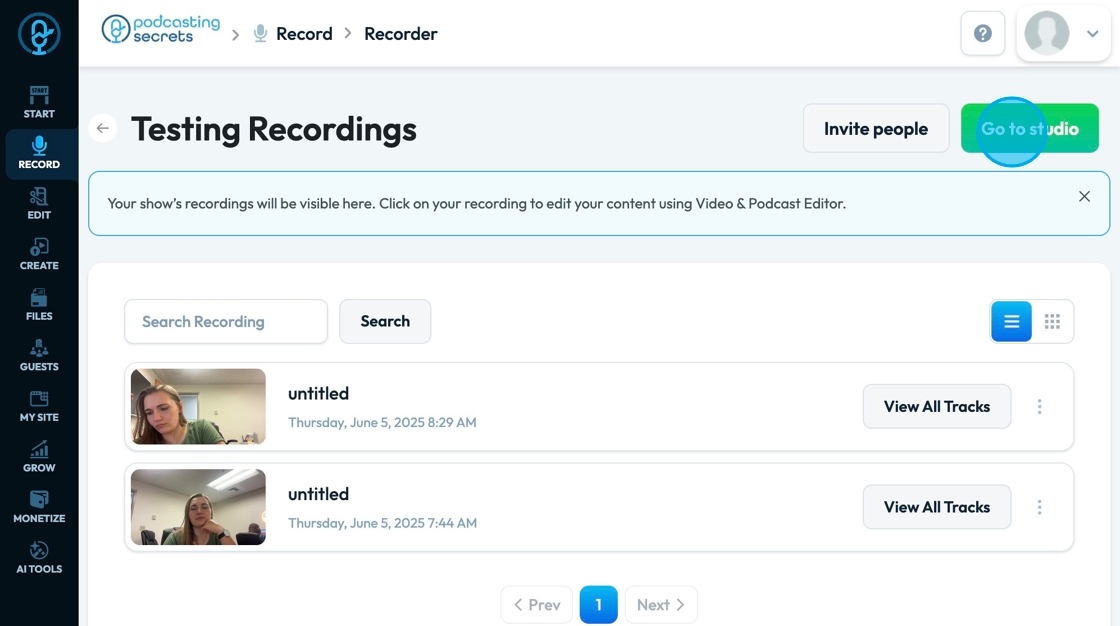
34. Your recording can be viewed under the studio name in "View all recordings"
- The number indicates how many recordings are currently in that studio
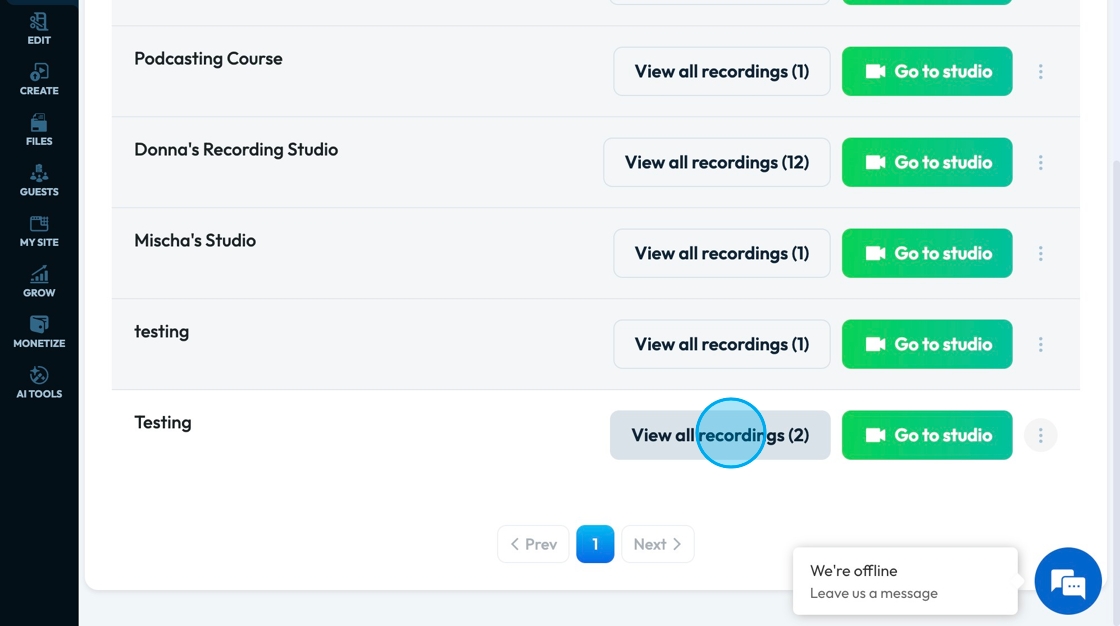
35. The recordings will be displayed in on the main page.
- You can search the recording using the search bar located above the recordings
- The view can be adjusted from grid view to list view using the toggle on the right side

36. Click "View All Tracks" to view the individual tracks of the recording
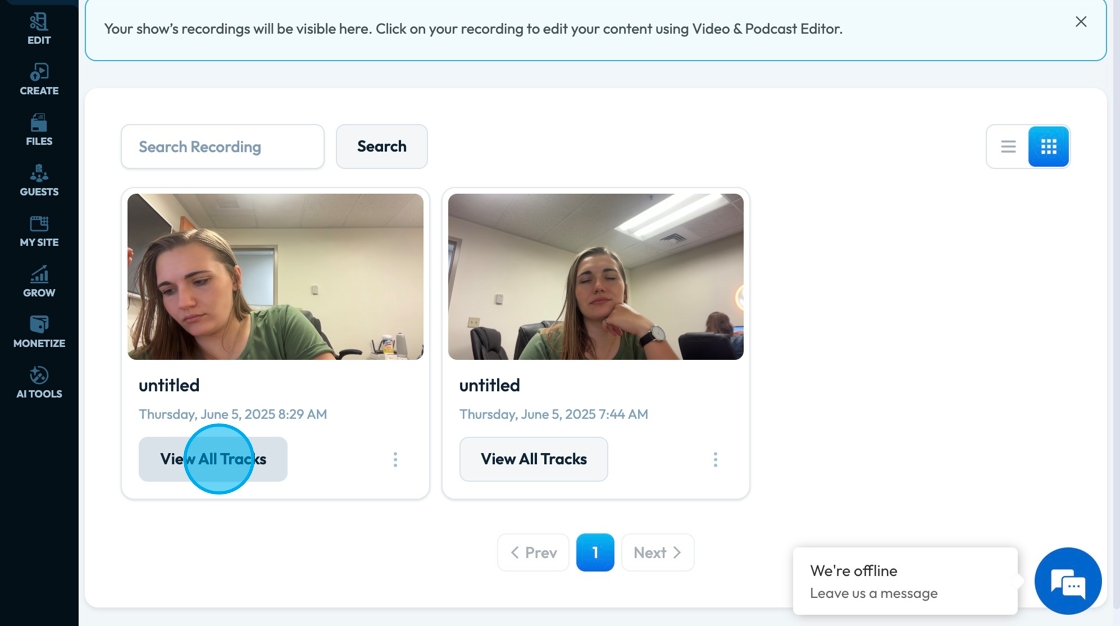
37. Once in the recording, you can download the video by clicking "Download" or edit the track by selecting "Open in Editor"
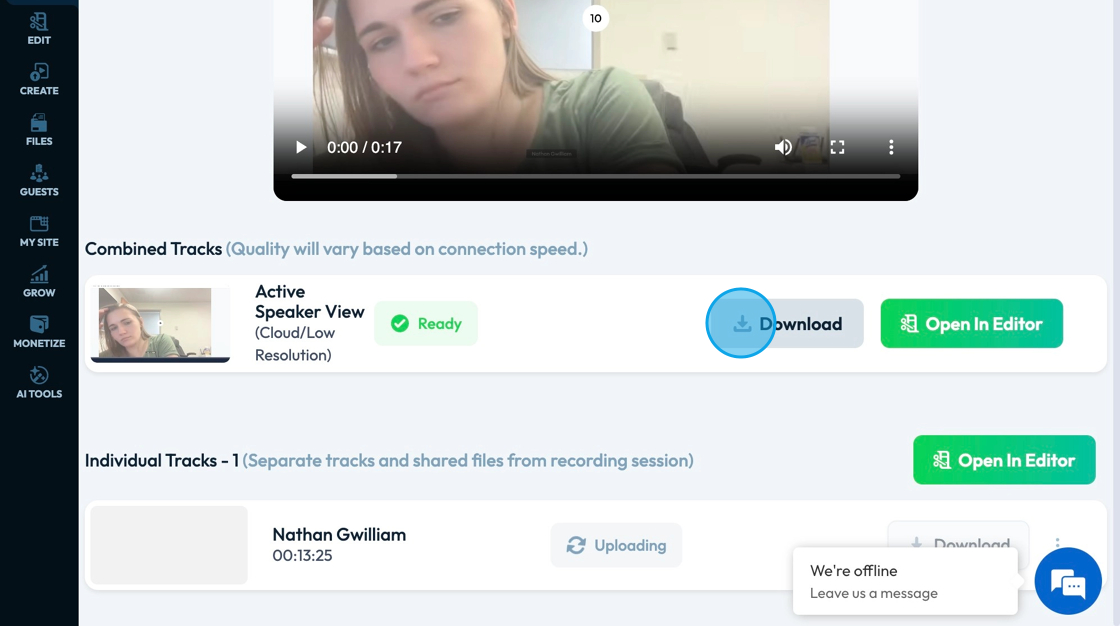
38. Combined tracks will show the video of all the tracks together
Individual Tacks will show each participant's video separately
- Individual tracks can be helpful for editing out any background noise or fixing problems with the video of 1 person. This can save you from needing to redo the whole video
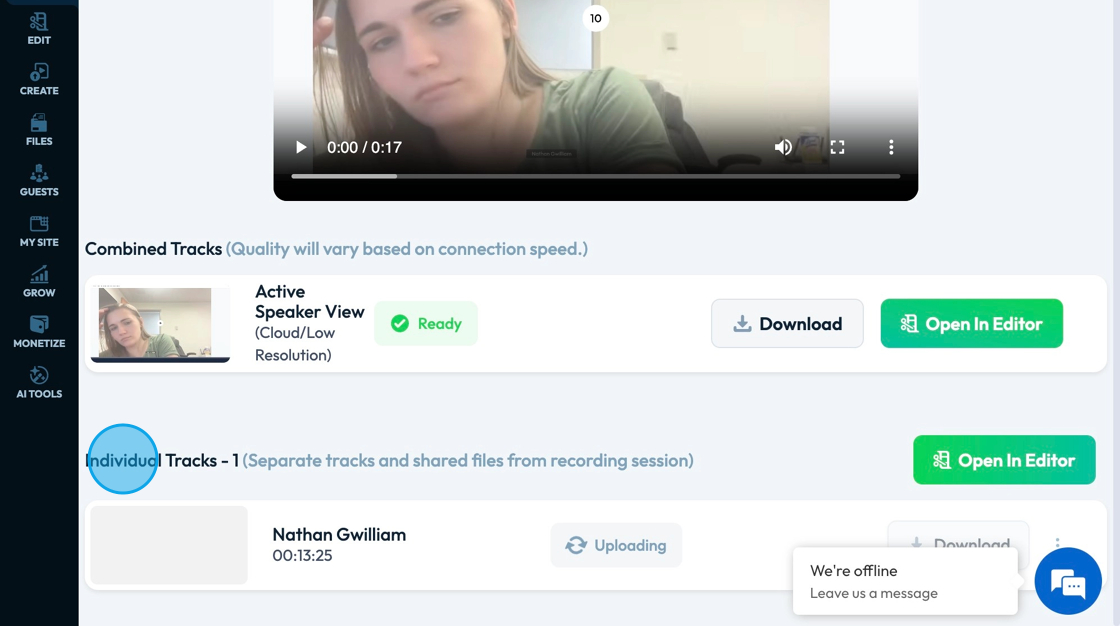
39. The 3 dots icon allows you to view all tracks, open in Editor, and delete recordings
40. From "Recordings" you can invite people to join your studio

41. Invite guests by sharing a link or inviting them via their email

42. Click "Go to studio" to enter the studio directly from "Recordings"
Related Articles
Hide your self-view in recorder
By following this guide, you can join a PodUp recording and manage self-view settings to focus on content without distractions. 1. Navigate to app.podup.com/home 2. Click on Record, Select Recorder 3. Select Studio 4. Navigate to ...How to Navigate Analytics (Detailed)
This guide offers a comprehensive overview of accessing and understanding podcast analytics through PodUp Analytics, making it essential for podcasters aiming to optimize their content reach. By breaking down key metrics and providing step-by-step ...Can you pin a video in the recorder?
You can use this guide to pin a video during recording to focus on key participants and make sessions more engaging. 1. Navigate to https://app.podup.com/home 2. Click "Record" 3. Select "Recorder" 4. The “List of Studios” page will open 5. Click the ...How Can I Check Who has Access to Recorder
By following the steps outlined, users can easily identify roles and permissions, ensuring proper access management. 1. Navigate to https://app.podup.com/home 2. Click "Start" 3. Click "My Team" 4. The ‘My Team’ page will open, where you can check ...How to Navigate Image Generator (Detailed)
This guide offers a straightforward process for generating AI images tailored for podcast studio setups, making it ideal for podcasters and content creators. By following the step-by-step instructions, users can easily visualize their podcast ...